Fabric marbling is a completely different process. Though it incorporates acrylic paint, it's similar to dyeing. It is used to apply abstract patterns to fabric or paper. Do not use craft acrylic for marbling. It contains too many additives. Use silk screening ink or make your own pigment ink.
Synthetic Oxgall is actually a surfactant so you can use clear Dawn dishwashing detergent.
Real Oxgall only works with alcohol ink. It doesn't work with acrylic. Get it on Etsy. Methylcellulose is a pigment suspension agent. It is also used as sizing to treat fabric and used on watercolor paper to prevent absorption. It's available from Dharma Trading for $15.95. You could use Carageenan, but it turns rancid too quickly. Alum (potassium alum, an acidic salt) is used to fix pigments on a surface. It will foam up when added to washing soda. It's available from Dharma Trading for $3.49/lb. Washing Soda is Sodium Carbonate or the Sodium Salt of Carbonic Acid, aka soda ash or lye. It is a water softener that easily dissolves in water and raises the pH. A water softener competes with the magnesium and calcium ions in hard water and prevents them from bonding with the detergent being used. If the water in your area is "hard" (contains lots of minerals) you will need to add 1 Tablespoon washing soda . Hard water will interfere with the process.
pH Test Strips $1.85 at Home Training Tools. Methocellulose is alkaline. The pH should be between 8-9. Adding water lowers the pH and causes it to turn rancid. It will also make diluted acrylic paint turn rancid during storage. Ammonia raises the pH. Add ammonia every time you mix or dilute with water to raise the pH. Add 1/8 teaspoon and test until the pH comes to 8-9.
Materials
100% cotton
Plastic tub with lid 2-4" deep
Mini 2 oz measuring cup
Plastic condiment cups with lids
Glass eye droppers or pipettes
Shallow food storage container
Drain board to catch drips
Newspaper
Trash can
Design Tools
Hair pick w/teeth 1/4" apart
Bamboo skewers
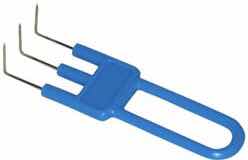
Floral card holder
Large comb: 6" plastic ruler w/toothpicks taped at 1" intervals.
Bouquet comb: 2x8" piece of cardboard with two staggered rows of penny nails pushed through at 1" intervals, 1/2" from the edge.
Mini broom: cut straw off a broomcorn broom and clump the pieces into dime size bundles. Make sure the bottom edges are even and tape the top. One broom for each color.
Fabric Prep
Cut fabric 1" smaller than the size of your tub. Soak in textile detergent to remove sizing.
4 Tbsp Alum
1 Gallon of Water
Saturate fabric and squeeze out excess. Do not let it soak! Too much alum or too long of exposure weakens the fabric. Weakened fabric can shred when pulled on or even during sewing and washing, and sometimes doesn't become obvious until it has been washed more than once. Pin on a line horizontally to drip dry. Do not pin one corner and let it hang. Do not handle prepared fabric with wet hands. Stretch of possible to avoid wrinkles.
The fabric must be treated and must be dry before it is marbled. It is best to use the treated pieces within 24 hours. If you can't, then wash out the alum and try again another time.
Caution - Ironing the fabric to remove wrinkles once the fabric has been treated is not recommended, as alum plus heat can weaken the fabric too, or even scorch. Small wrinkles will not effect the print.
Mixing the Methylcellulose
1-1/2 Tbsp Methylcellulose
1 Gallon warm water
1 Tbsp Borax
1 Tbsp Ammonia
In a bucket, add ammonia to the water and then slowly add Methylcellulose stirring constantly with a large spoon. Stir until the Methylcellulose is dissolved and appears clear, let sit for 30 min for bubbles to rise. Test the pH.
How thick the "size" needs to be will vary with the brand of ink being used and the effects you like best. Testing is good!
Pour the Methylcellulose solution into your marbling tub. Continue mixing Methylcellulose solution and adding it to the tub until it is 1" deep. Test the pH. If it's lower than 8, add ammonia and test again.
Prep
Prior to marbling, lay a single sheet of newspaper on solution. You may need to layer more than one sheet to cover it all. Pull all the newspaper across the solution, skimming the surface in one motion. Discard the newspaper immediately in the trash can. Do not wait for the Methylcellulose to stop dripping. The solution is now clean of dirt and bubbles and will keep for two weeks before it rots.
Mixing the Ink
Colors will be much darker in the cup than on the fabric. To get a dark or intense color, use more drops in one place. I suggest mixing a small amount of Methylcellulose in a shallow food storage container to experiment until you get the color and consistency right.
Test pigment ink first to make sure it's thin enough. Add a few drops of dispersant and test again.
Screen printing ink is thick and has to be diluted. In a cup, mix 1/4 oz of screen printing ink with a few drops of dispersant. Add 1-3/4 oz of water and stir. It should be the consistency of whole milk. Drop a few drops onto the Methylcellulose in a food storage container. If it looks like BBs, it's too thick. The ink drops should act like oil slicks and disperse across the Methylcellulose. Pour 1 oz of ink into another cup and add 1 oz of water.
Laying Color
Keep the dropper within an inch of the surface at an angle and don't shoot the ink. Don't try to squeeze all the ink out; it will create bubbles.
Lay the ink in lines or randomly scattered dots. Use two or more colors. Once you lay the first color, lay the second color across, on top, or around the first. The second color will disperse and push against the first, making the first color more concentrated and therefore darker.
The colors will not blend to create another color. Double loading ink will intensify a color. Comb across the ink just enough to intertwine the colors (except for cabbage rose, bark, and pebble).
The design produced is the result of the final combing. If you don't like a pattern, re-comb it or remove the ink with newspaper and start over.
Create "negative" areas in the design by placing soapy water or small droplets of Synthetic Gall on the surface with an eye dropper or by sprinkling it on. Use 1/8 teaspoon of liquid soap to 1/2 cup of water. Use this like a "clear ink" in your designs.
Large Peacock: Use the large comb horizontally and again vertically.
Small Peacock: Use the large comb horizontally and the hair pick vertically.
Feather: Use the large comb horizontally and a bamboo skewer up and down every inch vertically.
Swirls: Use a bamboo skewer to make circular designs which wrap like a cinnamon roll.
Webbing: Use the floral pick to pull the paint in different directions.
Pebbles: Do not pre-comb. Dip the mini broom into colorless paint. Tap the broom with your finger so dots spray over the surface. Add colors in the same manner. Do not comb.
Bouquet Pattern1: Use the hair pick to comb horizontally. Use the bouquet comb in an meandering motion vertically. Do not overlap vertical strips. Echo the contours of the previous strokes.
Bouquet Pattern2: Use the hair pick to comb vertically. Use the bouquet comb in an meandering motion vertically. Do not overlap vertical strips. Echo the contours of the previous strokes.
Bouquet Pattern3: Use the large come vertically. Use the bouquet comb vertically in a snake motion. Repeat the vertical snake motion to make a figure 8.
Bark: Do not pre-comb. Use the large comb and move back and forth horizontally.
Cabbage Rose: Do not pre-comb. Randomly sprinkle colorless paint over the entire surface. Lay the predominant color in large spots. Add other colors on top of the predominant color. Use the bamboo skewer to comb from the outside color spot to the center, pulling colorless paint towards the center in one stroke. Repeat around the perimeter.
Random Pattern: Use any tool and comb in a haphazard manner.
Printing the Fabric
Be sure the are no loose strings or hair on the fabric. There will be a white line where the string was. Lay the fabric smoothly on the ink. Once the fabric touches the ink, it is permanent!
Hold the fabric in a "U" shape. Slowly lower the base of the U to the surface. In a fluid movement, lay both ends down evenly. A hesitation in the movement produces a hesitation mark on the fabric. A hesitation mark looks like a crease.
Let the fabric lay on the surface for 10-30 seconds or until it looks wet. Leaving the fabric on the surface any longer will not produce a darker image.
To remove the fabric, lift it up by two adjacent corners with the claws and suspend it vertically over the tub until the Methylcellulose stops dripping. Excess ink will run, but the ink tracks will rinse off.
Lay the fabric on a drain board and carry it to the sink. Set the fabric in the sink with the drain board laid across it. Rinse the Methylcellulose off the drain board. Rinse the fabric with cold water beginning at one end. Let the water run down the fabric until it no longer feels slimey. Work in sections and lay each section on the drain board as it is cleaned. Don't rub the ink, just let the water rinse the Methylcellulose out.
Do not squeeze! The ink is not set until it is dry and ironed. Lay the fabric flat on newspaper. Cover with more newspaper to absorb water. Safety pin to a clothes line to drip dry. Do not use clothes pins. Anything that touches the fabric will leave a mark. It's best to do this over a bath tub indoors.
Once dry, iron it on the back using the hottest setting. If the iron gets black and gummy, you have not rinsed out all the Methylcellulose and you'll need to rinse it again. Let the fabric rest for two weeks and heat set it again. Soak it in textile detergent to remove the alum. Alum left in the fabric will cause it to rot.
Remove ink from the Methylcellulose with newspaper. Empty Methylcellulose into a bucket with a lid or leave it in the tub with the lid on.
Clean Up
If you’re not using your size again pour it down the toilet or run lots of hot water with it down the drain to avoid clogs.
Rinse the marbling tools in lukewarm water without soap. Soap residue on tools can contaminate future prints.
Rinse the tray thoroughly in a sink. Again, do not use soap.
Reusing the Size
Test the pH and add ammonia. The "size" can be used over and over again. It can be kept for 3 to 4 days at room temperature before it begins to mold and must be discarded. To keep it longer, refrigerate in a sealed jar. (Mark and tape the container clearly so it is not eaten.) Warm it to room temperature before using. If the "size" has been sitting awhile, clean the surface with strips of newspaper before using.


Hi Vera, I’m new to marbling and am having issues with lumpy methocel. Is this due to the PH in the water? I’ve added white vinegar as well as ammonia and it’s still lumpy. The ammonia also turned it yellowish color when I added it in. Can you give me any tips that May help me with the next batch?
ReplyDeleteWhy did you add vinegar? My instructions do not say to add vinegar. Vinegar acidifies the solution. The solution turned yellow because of the vinegar. It needs to be alkaline, thus the ammonia. You only need to add enough to keep the pH at 8. The ammonia or the pH has no effect on the methocel lumping. That's just the nature of it; it's like gelatin. Mix it with a bit of warm water in a separate container and mash it to break up the lump. Then, add it to the marbling water.
ReplyDelete