
I have not had any formal art training. I took the same art classes as any other public school student. For me, art is not a talent, but a skill that I had to learn. It would be great if I could pick up a pencil and draw something from my imagination, but I’m not that kind of artist. I’m fortunate when I’m successful at sketching something from looking at a photo.

Drawing from a photo isn’t as hard as it may seem. I find the easiest method is to use a photo that has an object touching the edge. Since I’m left-handed, I start with the bottom right corner and sketch my way up and across to the opposite edge.

Sketching is done in long or short strokes a few centimeters at a time. It’s another type of stroke work. There are no perfectly straight lines or shapes. If that’s what you want, use a ruler and a bow compass. But then, you’d be drafting, not drawing. I like to start with small objects, and then, move on to the main subject.

The first sketch is to get the basic form. Don’t expect it to be perfect because it won’t be. Never be deterred by imperfection; it only means there’s room for improvement. For now, pat yourself on the back. You’ve completed the first phase of a project. Put it down and return to it tomorrow.


Phase two of your rough sketch involves getting the scale and proportion right. Proportion creates balance. An animal’s tail is 3/4 of its body. The head is 2/3 of the width of its body. Draw lines on the outside edges of the object and see if the outside edges of your drawing line up with them. The right side of this owl’s body lines up with the intersection of the two branches. The left side of the body is about right. The feet need to be closer. The head needs to be smaller and the tail a little longer. If you get frustrated, stop and resume the next day. Art takes practice.
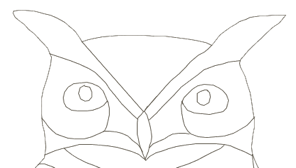

Phase three involves shape and symmetry. These two areas usually get the most of my attention. Does it look realistic? Symmetry is a really big deal for me, especially in the eyes. I concentrate on getting one side right, and then, I use tracing paper to get the symmetry. I fold the paper in half and trace the side that looks the most realistic. Then, I turn it over and transfer the lines to the other side.

Phase four involves the details which are the easiest part. You don’t need as much detail in the sketch because you fill in the majority of them when you color, so the pencil lines only serve as a guide. Perspective is the most important thing in art. It grabs the viewer’s attention. Pick one or two focal points and concentrate on perfecting those areas. The rest of the artwork can be imperfect and no one will care. A viewer may glance over the whole piece, but will return to the focal points and be mesmerized by them. I focused on the eyes and beak on this owl and it worked. No one notices that the head is almost straight.


I filled in the body and branch next and fixed the head.

When you color the background, make sure the colors compliment the focal object. This owl’s eyes are yellow, so I chose a green background with some yellow in it. The original photo had an olive background, which is technically a deep yellow-green. Any time you copy someone else’s artwork, even drawing from a photo, you have to change 10% to avoid copyright infringement. That’s another rule of art that applies to all media.
Drawing Aides


Forget about using your thumb or a pencil. Scale, center and perspective finders are indespensible for plein air work. They work with photos as well.


I drew my owl looking at an image on my phone. I don’t worry as much about scale as I do proportion. I can’t draw anything small. I attempted a self-portrait once and it ended up poster size. If you’re really concerned with scale from a photo or outline, then use a pantograph. A pantograph is used for scaling an outline larger or smaller than the original.

If you're still having trouble with drawing, there is a tool available that turns a phone or iPad/tablet into a projector that allows you to scale the image with a grid. It's called the Indraw Sketch Board, aka optical drawing board. It's available on eBay for $15.99. Amazon sells it for $38.00!
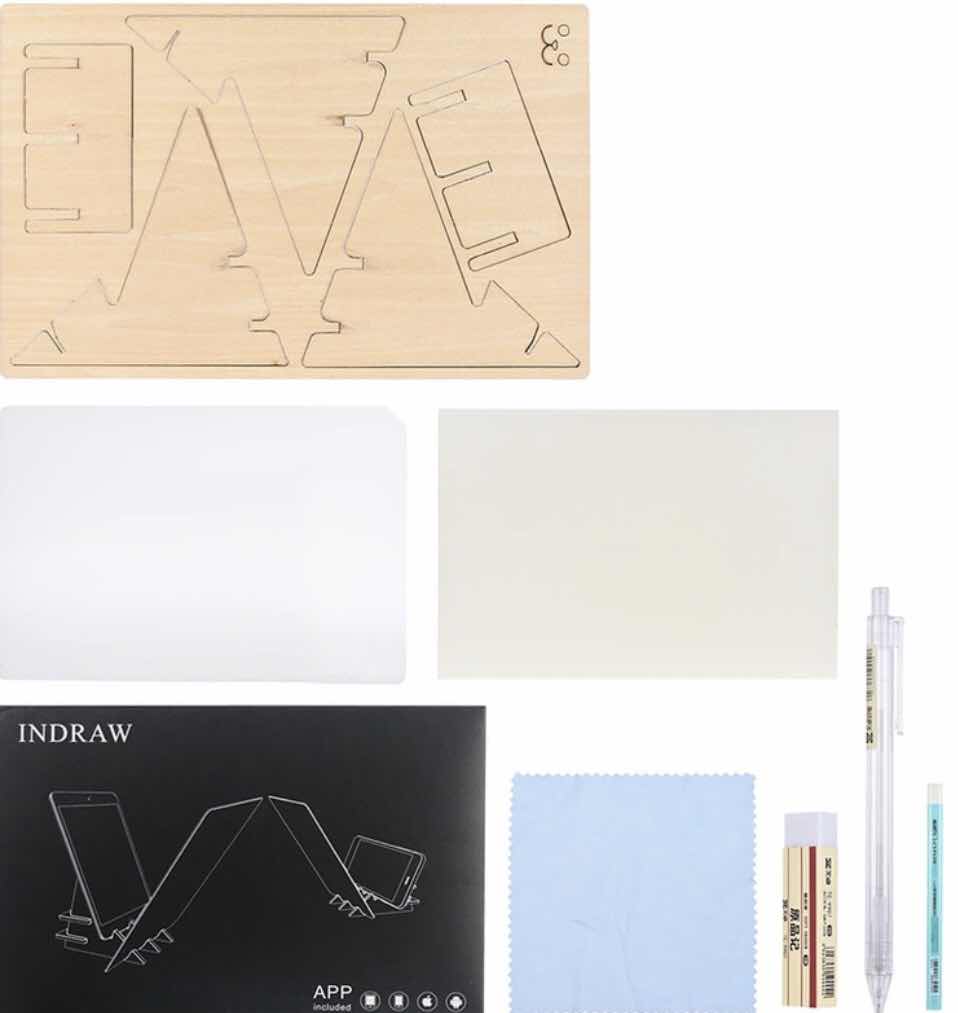
The stand must be assembled. Remove the perforated pieces gently as the wood is a bit fragile. It comes with practice paper, a mechanical pencil and spare lead, eraser and lint free cloth. It looks like a child's toy, but it isn't. Treat it with respect. This isn't something you want to replace every time a rowdy kid wants to play with it.

You have to download the app to use it, but it's free and available for both Apple and Google. I own this neat little gadget and I can tell you, there's a real learning curve to using it.


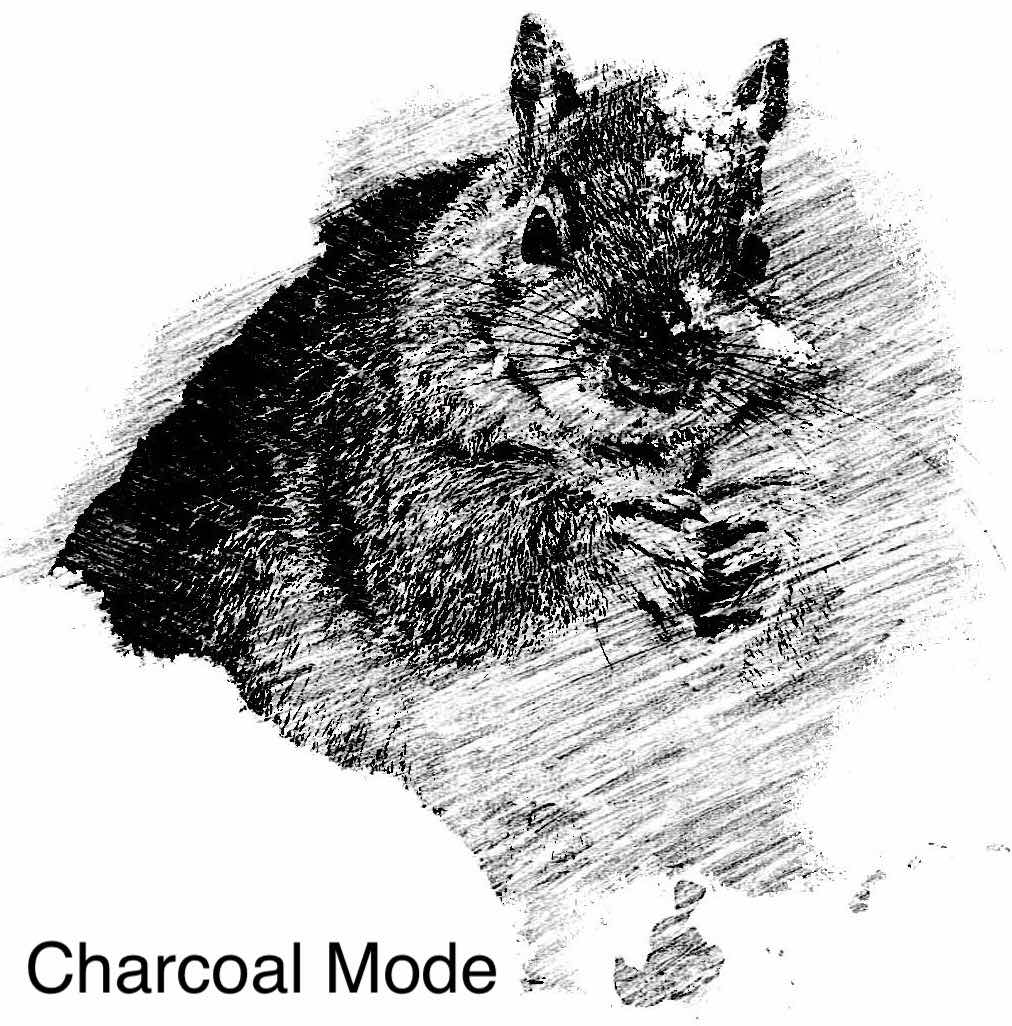
Pros: Position the device and lens either vertically or horizontally; use any image; draw from color, sketch, pen & ink or charcoal mode; adjustable brightness; adjustable detail; rotate and flip; zoom in or out to scale the image; grid lines for centering image on paper; save to album; glass is specially designed to remove shadows.

Cons: Must be used on a flat, level surface; glass is gray; not easy to align pencil with projection; must be used within a particular line of sight; must draw meridian lines on paper for accurate placement of projected grid lines; not easy to center on paper.

The digital sketch board is a modern adaptation of the Camera Lucida which is still available for $125.


A camera obscura (dark room) projects an image onto a screen to gauge perspective, tonal rendering, composition, light/shadow and gives the classic Vermeer look to a painting. The pinhole image is the natural optical phenomenon that occurs when an image of a scene at the other side of a screen (or for instance a wall) is projected through a small hole in that screen as a reversed and inverted image (left to right and upside down) on a surface opposite to the opening. The surroundings of the projected image have to be relatively dark for the image to be clear, so many historical camera obscura experiments were performed in dark rooms. Camerae obscurae with a lens in the opening have been used since the second half of the 16th century and became popular as an aid for drawing and painting.
David Hockney argues that artists discovered optical projection in the 1420s. This is how the old masters were able to capture and produce photographic realism. The earliest known written record of the camera obscura is found in the Chinese writings called Mozi dated to the 4th Century BCE, ascribed to Mozi, a Han Chinese philosopher.
Arab physicist, Ibn al-Haytham (known in the West as Alhazen) explained in his Book of Optics (circa 1027) that rays of light travel in straight lines and are distinguished by the body that reflected them. He described a 'dark chamber' and did a number of trials of experiments with small pinholes and light passing through them. This experiment consisted of three candles in a row and seeing the effects on the wall after placing a cutout between the candles and the wall. al-Haytam's writings on optics became very influential in Europe through Latin translations since circa 1200. Among those he inspired were Witelo, John Peckham, Roger Bacon, Leonardo da Vinci, Renes Descartes and Johannes Kepler.
Leonardo da Vinci studied optics extensively and wrote the oldest known clear description of the camera obscura by mirror writing in a notebook in 1502, later published in Codex Atlanticus. Over the years, da Vinci drew 270 diagrams of the camera obscura in his notebooks. The earliest use of the term "camera obscura" is found in the 1604 book Ad Vitellionem Paralipomena by Johannes Kepler. It remained unknown outside of the art world until Venturi translated and published the Codex in 1797.
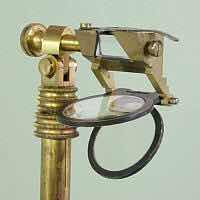


A camera lucida (well-lit room) reflects a large image over the drawing surface for sketching. It was patented in 1806 by William Hyde Wollaston. However, Johannes Kepler described a camera lucida in his Dioptrice in 1611. He described how the projected image of the camera obscura could be improved and reverted with a lens. It is believed he later used a telescope with three lenses to revert the image in the camera obscura. The camera lucida was apparently built or commissioned by individual artists and only produced commercially beginning in the 19th century. If white paper is used with the camera lucida, the superimposition of the paper with the scene tends to wash out the scene, making it difficult to view. When working with a camera lucida, it is often beneficial to use black paper and to draw with a white pencil.
The bottom line is this: the use of drawing aides isn't cheating because the old masters used them. Don't feel bad if you can't draw because they couldn't draw either! Think about the Cistine Chapel. Michael Angelo sketched those images on paper and projected them onto the ceiling. It's the only way he could've done it! I think realistic drawing became a textbook skill after the invention of photography because it simply didn't exist until then except for illustration purposes. Drawing and sketching wasn't considered fine art by the old masters the way it is today.
No comments:
Post a Comment