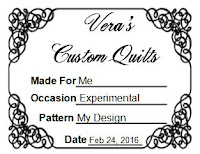
Open your image program and make a New Image 224x152 pixels; Resolution: 300.
Click on the Text Tool. Size 150 (you'll have to type the number into the drop down box). Line Width: 1 pixel, Foreground: Black, Background: Black. Click on the image and type in every letter of the alphabet, both upper and lower case to find the one you want to use.
When you've found it, click on Objects>Center in Canvas. Now, you can stretch the image until it touches the edges of the workspace. Right click on the vector object and Convert to Raster.
Click on View>Change Grid Properties. Set all four Grid Positions to 1 pixel. Click on View>Grid and blow up the image until you can count each grid line.
Click on the Pen Tool. Drawing Mode, Line Style: Solid, Line Width: 1 pixel. Foreground: Null, Background: Black. Hold down the shift key and draw lines where you will fill in information. Place the last line 3 pixels above the bottom line of the image. Convert to raster. Draw the next line 23 pixels above it. Convert to raster. Layers>Duplicate. Move the copied line 23 pixels up. Repeat this step for as many lines as you want. The grid will help you keep them lined up.
Click on Layers>Merge Visible. Click on Image>Resize. Inches. Width: 3. The Height will adjust automatically. Resolution: 300; Resample using: Smart Size; Lock Aspect Ratio; Resize All Layers.
File>Save As and save as a .png file. It needs to have a transparent background.
File>Save As and save as a .png file. It needs to have a transparent background.
Launch MS Word. New Document. Insert>Picture. Expand the image to 3" wide by 2 1/2" high. Center the image.
Click on the label and the Picture Tools Format tab will appear. Click on Wrap Text>Behind Text.
Right click on the page. Click on Paragraph. Alignment: Left; Outline level: Body Text; No Indentation; Spacing: Before: 6pt, After: 3pt., Single. I had to play with the space settings to get my text directly above the line and you may have to as well.
Type in your text. Press the spacebar to line it up.
Save the Word file. You can edit the information for each quilt. You can make these card size or address label size if you like. Use an Avery template for placement and to print them. The downfall to printing multiple labels on a sheet is that you will need to write the information on each label with a permanent micro pen. I'm one of those people who doesn't have pretty handwriting.

Dilute Matte Digital Ground 1:1 (1 oz ground & 1 oz water).
Cut out an 9x12" sheet of white muslin fabric. Wash fabric in textile detergent to remove sizing. Rinse and blow dry. Lay fabric on a piece of plastic. Coat the fabric with ground. Blow dry. Snip frayed threads. Brush white washable glue on the plastic side of the freezer paper. Lay the glued freezer paper on the back of the fabric. Iron the paper side to heat set. Trim down to 8.5x11". (My labels are 4x11"). Place in printer tray, fabric side down and freezer paper side up.
Print with settings: Plain Paper, Black Ink Only, Normal. Blow dry the ink and heat set.
Dilute matte varnish 3:1 (1-1/2 oz varnish & 3 oz water). Dab diluted varnish lightly with a cotton ball (do not swipe!). Allow it to saturate the fabric and blow dry. This prevents the ink from washing out. Remove the fabric from the freezer paper. The freezer paper is reusable. Simply brush on a new layer of glue.
Cut out the label, leaving a 1/4" seam allowance. I use an "add a quarter" ruler for this. Snip off the corners at a 45 degree angle. Fold seam allowance in half leaving 1/8" around the design and press with an iron. Lightly spritz the back of the label with water. Iron to the bottom right corner of the quilt. Sew close to the edge with clear monofilament and a zipper foot.


No comments:
Post a Comment