


Rose Wright (maiden name unknown) purchased the cabinet new. Rose handed it down to her daughter, Rosa Wright (Compton).


Rosa handed it down to her daughter, Rosie Compton (Smith). Rosie passed it to her daughter, Bessie Smith (Lee).
It skipped a generation because my grandmother, Mary Lee (Watson) didn't sew. She was too busy picking cotton and cutting broomcorn. My mother, Shirley Watson (Baker) got it, but she let it sit outside in the weather.
Now I have it. It needs a lot of TLC. If you have an heirloom or have purchased one that you would like to restore, I'll show you how I restored mine back to its original condition. You can find salvaged parts for treadles on eBay. You can get really creative with a restoration, but please restore the Singers to factory specs. People love the pre-electric model Singers for their nostalgia and don't want them messed with.
If you want to get creative, choose a White or New Home machine/treadle. Those machines were cheap knockoffs in their day and no one cares for them. A woman who had a White or New Home couldn't afford a Singer, so they were a status symbol.
The Singer cabinets were also status symbols. Wealthy women often had a drawing room cabinet with 10 drawers and external doors that concealed the machine.
Women of lesser means had the 2-7 drawer models or just a simple table.
I've seen furniture made with Singer treadle bases and it looks really cool, but it also breaks my heart because it means that it will never be inside a cabinet or attached to a working machine again. I'm just as aggravated by women who buy the old cabinets and use them for decorations or just because they collect antiques. It takes them away from sewists who would put them to good use. Nostalgia is fine, but these machines and cabinets were meant to be used. They deserve love and attention. Putting them on display all alone in a corner won't keep them healthy.
The primary business of the Singer Sewing Machine Company was actually making furniture. Leighton Pine, a young cabinet maker employed by Singer invented plywood and perfected the veneer making process in the 1860s. The first use of veneer by Wheeler and Wilson was to layer sheets of shaved wood on top of one another to make more efficient use of the lumber. Singer and Pine copied this technique by layering a sheet of more expensive wood on top of pine. Pine also discovered that if layers of wood are crossed in alternate directions, it makes the wood stronger. This is plywood. Singer introduced steam heated veneer drying plates that increased the speed of production. In 1880, Pine realized that gumwood (nyssa) was cheap because it was elastic and had a tendency to warp even though it is strong and hard. He figured out that all of the moisture could be wrung out of gumwood veneer with rollers. He made a further discovery that if gumwood was steam separated into layers and then, pressed it into a shaped form, it achieved strength, rigidity and beauty. Singer's bent gumwood case covers entered the market in 1884.
The wood is dry and brittle, so I have to be gentle with it. I hand sanded it with 220 grit sandpaper, removing any old veneer as I went. I did not apply veneer to the cabinet pieces or pitman rod, only to the drawers, top and bottom. It has a center drawer and knee plate that isn't pictured. I sprayed the dust off with an air compressor and wiped all the wood with a tack cloth. I coated the cabinet pieces and pitman rod with shellac.
I had to cut new top pieces out of 1/2" sande plywood. A full 4x8' sheet is $35.95 at Home Depot. An easy way to do this is to trace the original pieces onto poster board. Write down the measurements as well and take them to the lumber store with you. Take plenty of photos. Ask someone to cut the pieces you need from their scraps, but be sure to tell them what kind of wood you want. Take a knob, cabinet pieces or the pitman rod to have copies turned on a lathe. Show the employee photos of your project so they'll know what you need. You never know if someone in the store might be familiar with antique cabinet restoration. This will be more convenient and cost effective.


I chose 3/16" wood backed Tiger Oak veneer with little flake for $64.00/2x8' sheet from the Veneer Factory Outlet. Veneer can be cut with a paper cutter. Tiger Oak was traditionally used on these cabinets, but feel free to use any wood you like. The Amish preferred dark woods like cherry, mahogany and walnut; they still do. Everyone else preferred oak.
Titebond Hide Glue has good tack and allows for longer working time. It can also be heated with a clothes iron to remove bubbles or reposition if necessary. It's available on Amazon for $9.14/8 oz. Hide glue has a short shelf life so only get the amount that you think you'll use for a project if you don't use it all the time. Spread evenly with a natural bristle brush.
As is often the case with antique veneered furniture, some of the appliqués were missing or broken and they can't be purchased because no one makes replicas. The originals were fine wood powder mixed with glue and pressed into a mold.
The first thing I did was make a mold with one of the whole appliqués. This was easier said than done. Some of the pieces had to be mirrored to create a whole piece in the mold. I used Easy Mold Silicone Putty because it's really soft and pliable, but impresses tiny details and doesn't need a release agent. It's available from Amazon for $16.95. You can get really creative with this by using silicone cake decorating molds.
I discovered a new product called Textura Paste. Textura is a water based paste that mimics wood appliqués. It has to be applied fresh to sanded wood. It is used with stencils or stamps and can be stained, painted or varnished after it is cured. I packed the paste into the silicone mold and pressed it to the wood. I waited for the paste to cure to the wood before removing the mold. An alternative to the paste is paper clay or plaster of Paris for use on walls. If you're determined to make them out of wood, mix sawdust powder with wood glue until it is the consistency of clay and pack it into the mold. Allow it to cure before removing it from the mold. Allow it to continue curing until it is solid. For a wood grain finish, soak wood paper in water until it is pliable and adhere it to the surface. You can also cut the paper to form and press the wet paper into the mold. Pack the glue and wood powder mixture on top of it.
Glue the appliqués onto the veneer and allow the glue to cure. You can stain the wood or paint it any color you want. Varnish with shellac over stain or polyurethane over paint for a durable finish. I really can't imagine why someone would want to paint such a beautiful piece of Edwardian furniture.
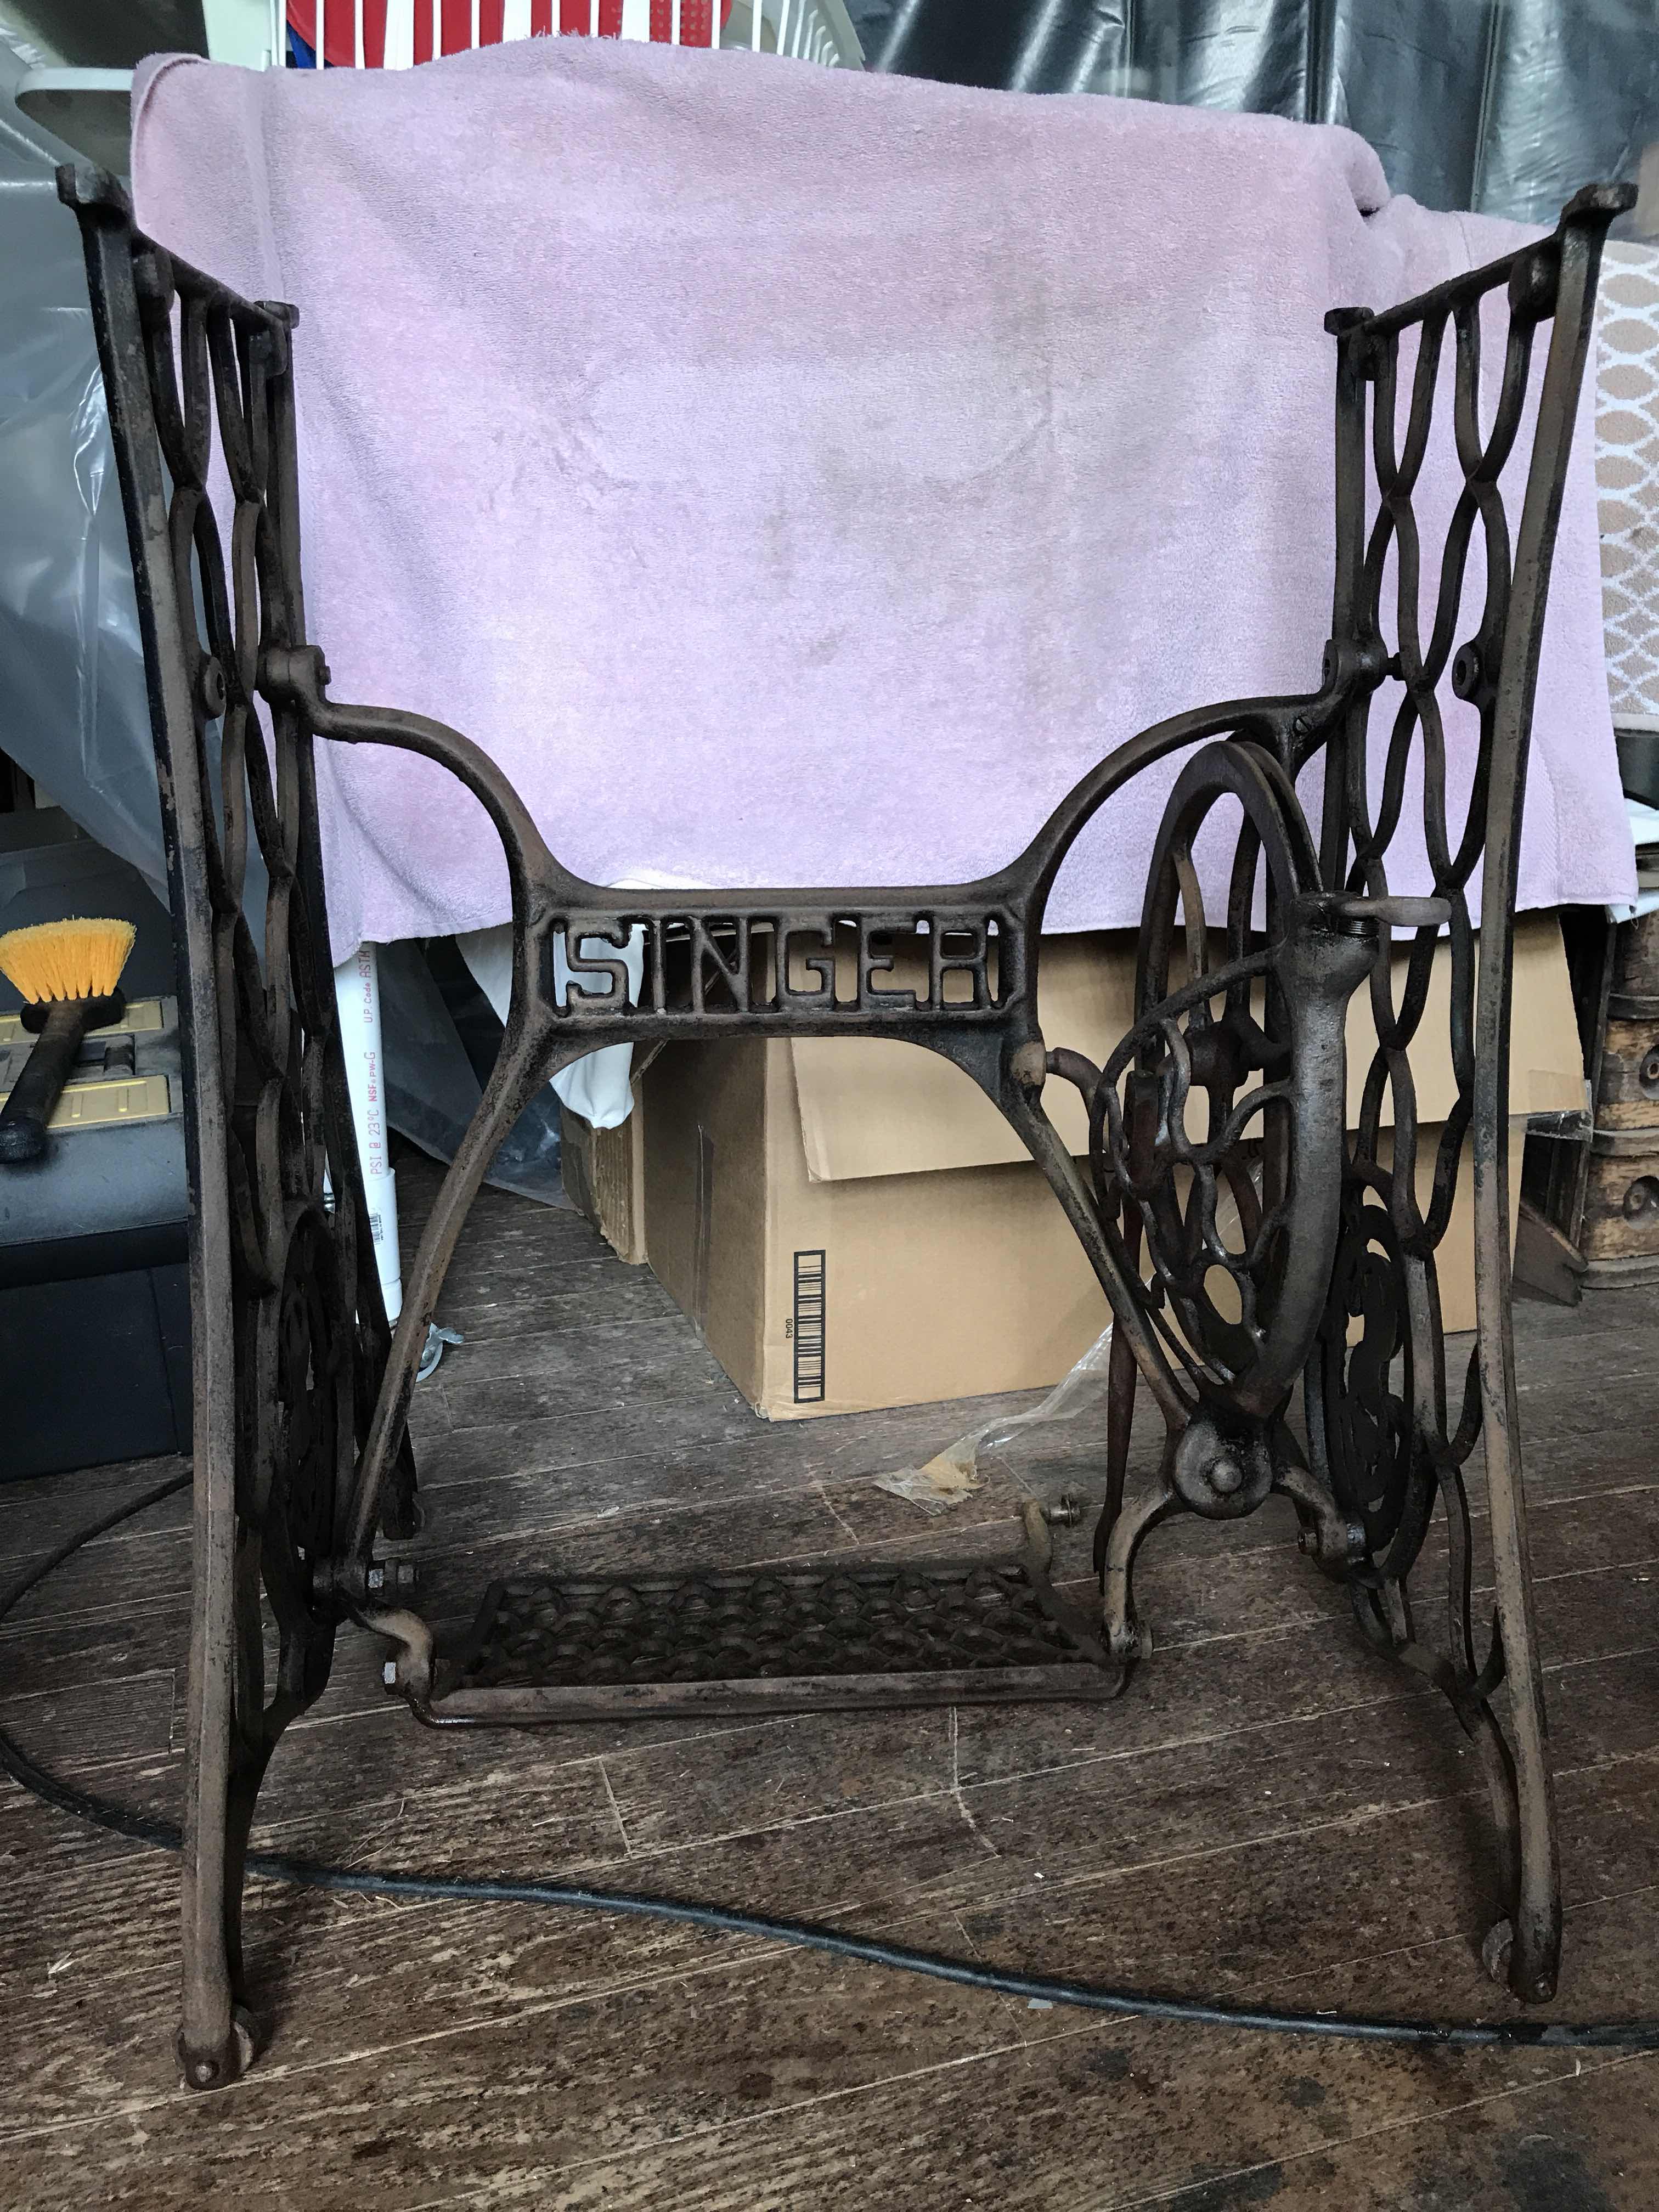
I scrubbed the iron with rust stripper and a wire brush and then, hosed it off. Then, I dried it with an air compressor. I let it dry overnight before I gave it a second cleaning. I didn't want this iron getting saturated with water. I had to let it dry in between cleanings to prevent rust. After I got the rust off, I sand blasted it to remove the old paint. Japanning can only be done on bare metal. Iron is a porous material that has to absorb oil and the protective coating provided by the paint. Separate all of the metal pieces before painting to ensure a thorough coating on all parts.
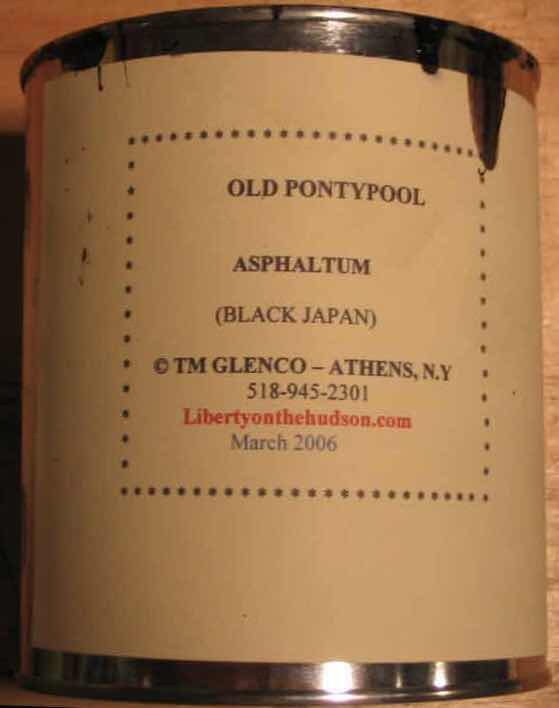
The original treadles and machines were painted with Japan black or bituminous black paint. It is especially known for its use on iron. It is so named due to the history of black lacquer being associated in the West with products from Japan. It was used extensively in the production of automobiles in the early 20th century in the United States. Japan black consists of asphaltum in naphtha or terpentine and linseed oil. The high bitumen content provides a durable waterproof finish that dries quickly. It is applied directly to metal, dried for 48 hours and then, baked at 400F for one hour. You can purchase Pontypool Black Japanning Asphaltum Paint from Liberty on the Hudson for $83.95/quart. However, it can be made at home.

Asphaltum (Bitumen, Gilsonite) is available from Natural Pigments for $7.50/4 oz. I'm not sure if cold or tubed roofing tar can be used for this because there might be other ingredients added to it.


Mini Muller from Ancient Earth Pigments for $8.00.

Blick Palette Knife #62 You need this for mixing pigment on glass. $5.83 each at Blick Art.
Bituminous Oil Paint
4 oz Asphaltum
10 ml Linseed Oil
Terpentine
Empty paint can
Start by grinding your pigment if it isn't finely ground enough. Place powder on the glass and make a hole in the center. Pour oil into the center. Work into a paste with the palette knife. Add more oil, if necessary. Mull to a fine paint. Store in a paint can. Thin with terpentine to the consistency of ink. You can obviously mix this formula in larger quantities.
Brush a thin, even layer onto bare metal with a natural bristle brush. Allow to dry 24-48 hours between coats. Allow the metal to soak up as much oil as it wants. The paint will become more opaque with each layer. Count on a minimum of 5 layers. You'll know you have enough when the oil stops absorbing. Wipe off excess oil with a lint free cloth.
Bake in a smoker or outdoor oven at 400F for one hour.

Feel free to use other paint like Rustoleum metal primer and enamel, so long as it is oil based. The spray can metal colors work as well.
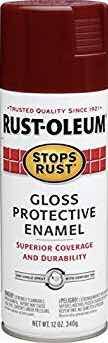


If you want to use automotive paint, choose single stage enamel (not acrylic or urethane). Rustoleum offers a great selection of paints for metal. They can be used on both the base and the machine.

I purchased new decals from Singer Decals for $79.95. You can get creative with water slide decals as well.

Temporary Tattoos has a vast selection of artwork to choose from including metallic, foil, glow in the dark and glitter. They have some beautiful henna design sets that would look great on a sewing machine. They also offer custom printing of your designs.

Nail Art Decals applied to strategic places would look pretty and they can match the tattoos.

Waterslide decal paper is available on Amazon for $18.99 if you want to print your own designs. Celtic knotwork is beautiful on an old machine. Singer only released one Celtic knotwork design


I found these beauties on the Internet. Don't be afraid to jazz up your machine. You can't tell the difference between a White or New Home and a Singer after they've been stripped down to bare metal. Just don't pass them off as Singers if you intend to sell them. There is a lot you can do with antique and vintage machines. Treat them with respect and us old timers might not complain too much.
Care and Maintenance
There's no point in going through all the trouble of restoring an antique or crafting a reproduction cabinet if you don't intend to maintain it.

If you've ever heard of using car wax on a machine bed to make it slick, it comes from waxing old machines to protect the finish. Bituminous paint and oil based enamel will break down over time. The best product to maintain iron is original formula Zymol that is based on a 120 year old German formula. It contains carnauba and beeswax with micro polishing agents that restore nutritive oils to enamel finishes without harsh solvents. Wipe it on, let it haze and buff it off. If you can't find it in a store, you can get it on Amazon for $22.99.

If you don't want to use shellac on the wood, coat it with Alfie Shine, a resin enriched hard wax polish developed from a 17th century recipe. It works on wood, metal and leather. Get it on Amazon for $14.50.

Beeswax polish will keep natural wood maintained. Using a double boiler, melt a 1/2 pound of unrefined beeswax. Remove from heat. Pour in 1 pint of olive oil. Stir to combine. Pour it into a jar. Allow it to cool and set. Dip a lint free rag into the wax and rub it into the wood. Allow the wood to absorb the wax. Buff it with another cloth. Repeat for a natural finish.

The best thing for cleaning wood is actually vinegar and olive oil. I know that commercial products contain either lemon or orange oil, but you should never use limonene on shellac or waxed wood because it is a natural terpene that will destroy the finish. Don't use Pinesol either for the same reason.
To clean wood: Pour 1 cup of water and 1 cup of cleaning vinegar into a spray bottle. Add 1 tablespoon of olive or tung oil and shake. Spray on wood and rub off with a lint free cloth.
To restore old dry wood: Mix 1 tablespoon of cleaning vinegar with 3 tablespoons of olive or tung oil in a jar. Dip a lint free rag into the solution and rub to polish. Only a small amount is needed.

Tung Oil made from the tung nut is a fast drying oil. It was used in China for 2500 years for making oil paint and for waterproofing wood and paper parasols. A rag soaked in tung oil will spontaneously combust, so be careful with it.

6% Cleaning Vinegar is Acetic Acid; it is 20 times stronger than 5% pickling vinegar. 20-30% is horticultural vinegar used for killing weeds. If you can't find it locally, it's available from Walmart.com.
No comments:
Post a Comment